LoRaWAN Air Quality Measurement
CO2 Data Transmition via LoRaWAN
The LoRaWAN project was the project of my first practical phase at Nokia. The idea was to get a first hands-on experience with some sort of radio transmission and to have a project where we have to work with hard- and software. The goal was basically to set up a CO2 measuring station which measures the CO2 concentration in the air and sends the data via LoRaWAN to a LoRaWAN gateway where it gets forwarded to a computer. The data should be displayed on the computer with some sort of traffic light to check the CO2 value.
LoRaWAN
First of all, let’s have a look at what LoRaWAN actually is. Here’s a slightly modified excerpt from Wikipedia that summarizes it pretty well:
LoRa (from “long range”) is a physical proprietary radio communication technique. LoRaWAN (Wide Area Network) defines the communication protocol and system architecture. Together, LoRa and LoRaWAN define a Low Power, Wide Area (LPWA) networking protocol designed to wirelessly connect battery operated devices to the internet, and targets key Internet of things (IoT) requirements such as bi-directional communication, end-to-end security, mobility and localization services. The low power, low bit rate, and IoT use distinguish this type of network from a wireless WAN that is designed to connect users or businesses, and carry more data, using more power. The LoRaWAN data rate ranges from 0.3 kbit/s to 50 kbit/s per channel.
The key takeaway from this is that on behalf of a LoRaWAN network you can transmit data over a comparable long range (2-15 km) while needing little power, which makes this system perfect for communication with battery-operated devices. The only downside is of course that with the long range and the little power the transmittable datarate is pretty low. As LoRaWAN is mostly used for connecting sensors in remote areas, this is not a big problem as the data packages are very small most of the time for sensors measuring only one or a few values.
As you can see, LoRaWAN is suited perfectly for this project; the CO2 data is not very large, and there will not be much power lost on data transmission.
Setup in more detail
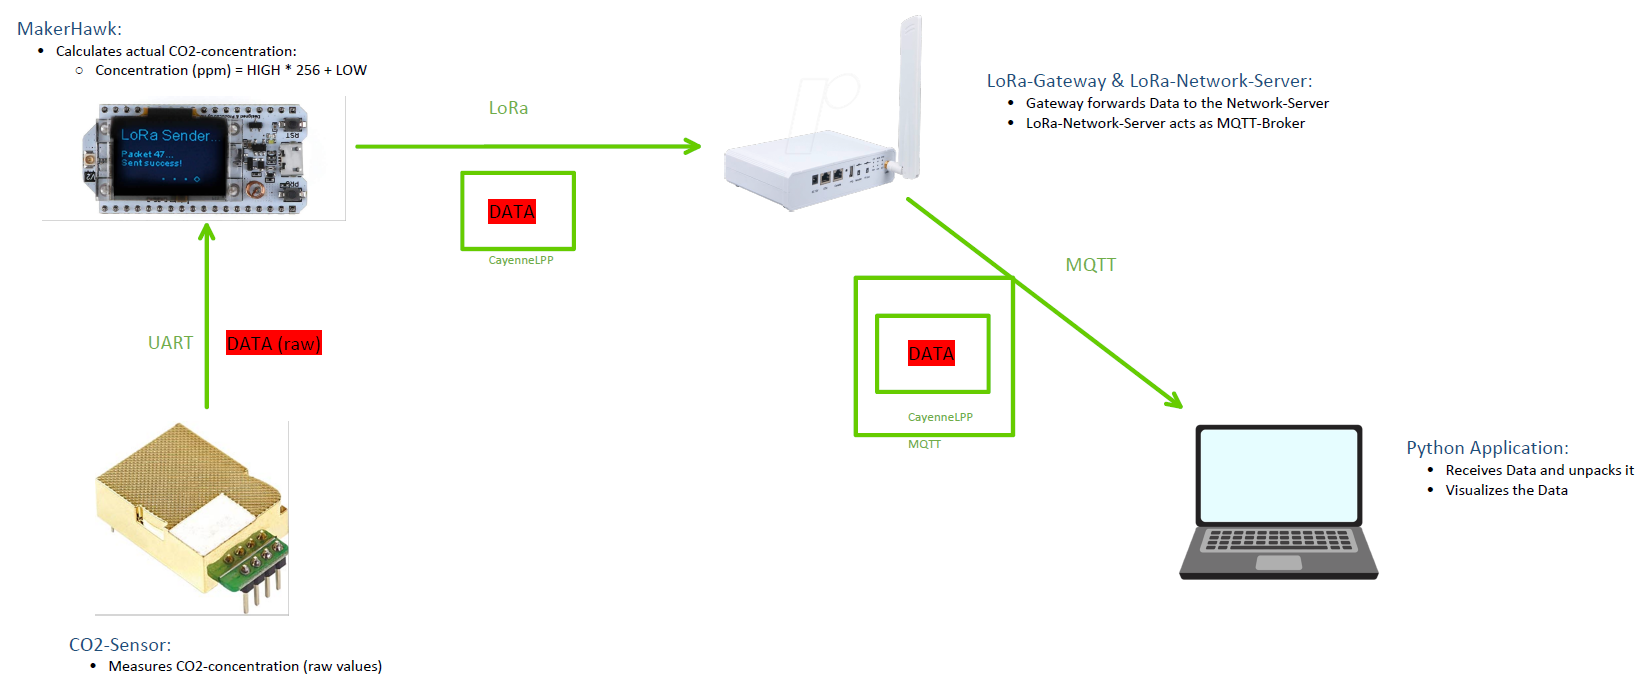
The measuring station itself consists of a makerhawk with a LoRaWAN module which is connected to a CO2 sensor. The makerhawk receives the raw values from the sensor via UART, calculates the concentration level from it and then sends the result via LoRaWAN to the LoRaWAN gateway. The gateway is connected to the local network and acts as a MQTT broker. When the gateway receives a new value, the gateway passes the package to the broker. From the client’s perspective, the python application subscribes to the MQTT broker and then also receives the data package. Now the CO2 value can be unpacked and the traffic light color can be adjusted to the value.

CayenneLPP
As you can see in the architecture diagram, a special package type called “CayenneLPP” is used when sending data over LoRaWAN. Cayenne Low Power Payload (CayenneLPP) is a lightweight data format commonly used in LoRaWAN applications. It simplifies the transmission of sensor data over LoRaWAN networks by providing a standardized way to encapsulate sensor data into a compact and efficient payload format. This makes it easier to send and decode sensor data, ensuring interoperability and efficient use of bandwidth in LoRaWAN applications.
TTN
For the setup as explained above obviously a LoRaWAN gateway is required. Nevertheless, there is also another way to communicate with LoRaWAN devices even without having access to a LoRaWAN gateway, the “The Things Network”. The “The Things Network” (TTN) is a global LoRaWAN network that operates on an open-access, community-driven model. It encourages individuals and organizations worldwide to set up and register their LoRaWAN gateways ensuring a vast network with global reach. This collaborative ecosystem allows anyone to connect their LoRaWAN devices to the internet via TTN’s infrastructure. The process for setting up a system like the one above but with TTN is extremely simple:
- Register Device: Sign up on TTN, register your device, and get unique keys.
- Device Configuration: Configure your device with these keys to send data.
- Data Transfer: The device sends data to TTN gateways.
- TTN Integration: Use TTN’s platform to access, process, and integrate your device’s data.
Overall the project was really interesting and achieved the goals mentioned in the introduction completely! I hope that maybe this project encourages you to also start your own LoRaWAN project as it is really simple and lots of fun!